8.1 KiB
Introduction
It is possible to install HockeySDK either using a binary framework distribution or as a Xcode subproject. While a binary distribution is a little easier to integrate and doesn't need to be compiled again, using a subproject allows you to debug through the code and make individual changes.
This document contains the following sections:
- Prerequisites
- Installation with binary framework distribution
- Installation as subproject
- Setup HockeySDK
Prerequisites
- Before you integrate HockeySDK into your own app, you should add the app to HockeyApp if you haven't already. Read this how-to on how to do it.
- We also assume that you already have a project in Xcode and that this project is opened in Xcode 4.
- The SDK supports iOS 4.0 or newer.
- Make sure any other crash reporting framework or exception handler is disabled!
- Make sure previous versions of
PLCrashReporteris removed! Search forCrashReporter.frameworkin your Project navigator.
Installation with binary framework distribution
Download & Extract
- Download the latest HockeySDK-iOS framework.
- Unzip the file. A new folder
HockeySDK-iOSis created. - Move the folder into your project directory. We usually put 3rd-party code into a subdirectory named
Vendor, so we move the directory into it.
Integrate into Xcode
-
Drag & drop the
HockeySDK-iOSfolder from your project directory to your Xcode project. -
Similar to above, our projects have a group
Vendor, so we drop it there. -
Select
Create groups for any added foldersand set the checkmark for your target. Then clickFinish. -
Select your project in the
Project Navigator(⌘+1). -
Select your target.
-
Select the tab
Build Phases. -
Expand
Link Binary With Libraries. -
You need all of the following frameworks:
CoreGraphics.frameworkFoundation.frameworkQuartzCore.frameworkSystemConfiguration.frameworkUIKit.framework

-
If one of the frameworks is missing, then click the + button, search the framework and confirm with the
Addbutton. -
Select
Build Settings -
Search for
Other Linker Flags -
Double click on the build Setting titled Other Linker Flags.
-
Add
-ObjC
-
Hit
Done. -
Search for
preprocessor macros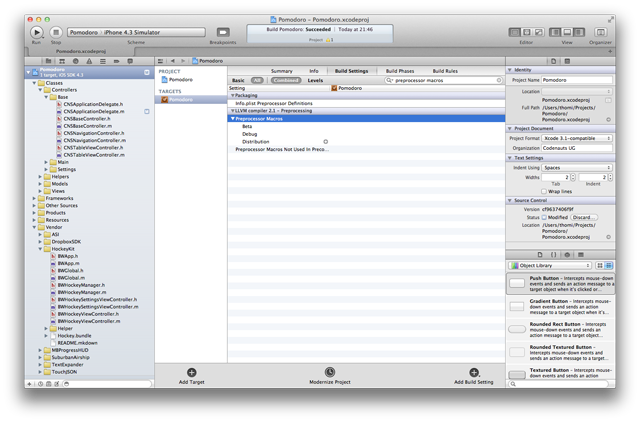
-
Select the top-most line and double-click the value field.
-
Click the + button.
-
Enter the following string into the input field and finish with "Done".
CONFIGURATION_$(CONFIGURATION)
Now you can use
#if defined (CONFIGURATION_ABCDEF)directives in your code, whereABCDEFis the actual name of YOUR build configuration. -
HockeySDK-iOS also needs a JSON library. If you deployment target iOS >= 5, everything is set. If your deployment target is iOS 4.x, please include one of the following libraries:
Installation as subproject
Add the source as a Git Submodule
- Open a Terminal window
- Change to your projects directory `cd /path/to/MyProject'
- If this is a new project, initialize Git:
git init - Add the submodule:
git submodule add git://github.com/BitStadium/HockeySDK-iOS.git Vendor/HockeySDK. This would add the submdolue into theVendor/HockeySDKsubfolder. Change this to the folder you prefer.
Add HockeySDK to your project
-
Find the
HockeySDK.xcodeprojfile inside of the cloned HockeySDK-iOS project directory. -
Drag & Drop it into the
Project Navigator(⌘+1). -
Select your project in the
Project Navigator(⌘+1). -
Select your target.
-
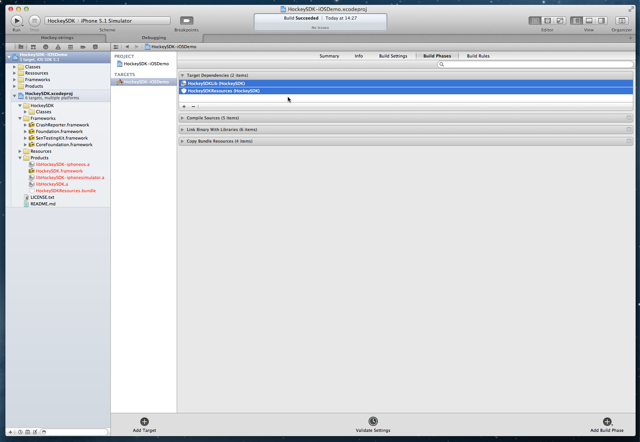
Select the tab
Build Phases. -
Expand
Target Dependencies. -
Add the following dependencies:
HockeySDKLibHockeySDKResources
-
Expand
Link Binary With Libraries. -
Add
libHockeySDK.a
-
Drag & Drop
CrashReporter.frameworkfrom theFrameworksfolder inHockeySDK.xcodeproj
-
You also need all of the following frameworks:
CoreGraphics.frameworkFoundation.frameworkQuartzCore.frameworkSystemConfiguration.frameworkUIKit.framework
-
Expand
Copy Bundle Resources. -
Drag & Drop
HockeySDKResources.bundlefrom theProductsfolder inHockeySDK.xcodeproj -
Select
Build Settings -
In
Header Search Paths, add a path to$(SRCROOT)\Vendor\HockeyKit\Classes
-
Search for
Other Linker Flags -
Double click on the build Setting titled Other Linker Flags.
-
Add
-ObjC -
Hit
Done. -
Search for
preprocessor macros -
Select the top-most line and double-click the value field.
-
Click the + button.
-
Enter the following string into the input field and finish with "Done".
CONFIGURATION_$(CONFIGURATION)Now you can use
#if defined (CONFIGURATION_ABCDEF)directives in your code, whereABCDEFis the actual name of YOUR build configuration. -
HockeySDK-iOS also needs a JSON library. If you deployment target iOS >= 5, everything is set. If your deployment target is iOS 4.x, please include one of the following libraries:
Setup HockeySDK
- Open your
AppDelegate.mfile. - Add the following line at the top of the file below your own #import statements:
#import "HockeySDK.h" - Let the AppDelegate implement the protocols
BITHockeyManagerDelegate,BITUpdateManagerDelegateandBITCrashManagerDelegate:@interface AppDelegate() <BITHockeyManager, BITUpdateManager, BITCrashManager> {} @end - Search for the method
application:didFinishLaunchingWithOptions: - Add the following lines:
[[BITHockeyManager sharedHockeyManager] configureWithBetaIdentifier:@"BETA_IDENTIFIER" liveIdentifier:@"LIVE_IDENTIFIER" delegate:self]; [[BITHockeyManager sharedHockeyManager] startManager]; - Replace
BETA_IDENTIFIERwith the app identifier of your beta app. If you don't know what the app identifier is or how to find it, please read this how-to. - Replace
LIVE_IDENTIFIERwith the app identifier of your release app. - Add the following method:
This assumes that the Xcode build configuration used for App Store builds is named- (NSString *)customDeviceIdentifierForUpdateManager:(BITUpdateManager *)updateManager { #ifndef CONFIGURATION_AppStore if ([[UIDevice currentDevice] respondsToSelector:@selector(uniqueIdentifier)]) return [[UIDevice currentDevice] performSelector:@selector(uniqueIdentifier)]; #endif return nil; }AppStore. Repleace this string with the appropriate Xcode configuration name. - If you have added the lines to
application:didFinishLaunchingWithOptions:, you should be ready to go. If you do some GCD magic or added the lines at a different place, please make sure to invoke the above code on the main thread.